

There are two base types of recon, active and passive. Both have their pros and cons, so let’s cover these types of recon briefly:
- Active Recon: This type of recon requires that we interact with the target. This recon is faster and more accurate, but it also makes much more noise. Since we have to interact with the target to gain information, there’s an increased chance that we’ll get caught by a firewall or one of the network security devices. (Intrusion Detection Systems, network firewalls, etc.)
- Passive Recon: This type of recon doesn’t require any interaction with the target, so it is farless likely to be detected. The trade off is that the information gained is not as accurate and it’s much slower than it’s active counterpart. Passive recon is the act of watching the target. Instead of interacting with them, we can watch their traffic and gain information without so much as pinging them.
Now that we’ve covered the two base types of recon, let’s go over some of the recon terms that we’ll hear commonly:
- Discovery: This is the act of discovering possible victims. Discovery is essential to reconnaissance as it tells us who our potential victims are.
- Port Scanning: As the name implies, this is the act of scanning a range of ports on a victim. A port is used to make connections and manage communications for net-workable services or applications. Any open port is a possible avenue of attack. There are multiple kinds of port scans, but those go beyond the scope of this introductory article.
- OS Fingerprinting: OS fingerprinting is the act of attempting to determine a victims operating system. Knowing the victims OS is crucial to choosing an attack that will work. Attempting a Windows based attack on a Linux victim doesn’t make much sense.
Now that we know about these terms and methods. Allow me to introduce you to one of the most used and best active recon tools, nmap. Nmap stands for network mapper. Nmap is an active reconnaissance tool, so it will make some noise. We’ll be using nmap to quickly demonstrate the above concepts. We’ll be performing our recon via Kali Linux, which already has nmap installed. The target we’ll be performing reconnaissance on is Metasploitable, running inside VirtualBox. For instructions on how to install Metasploitable and VirtualBox, please see this article.
First, we’ll scan through our targets to discover the Metaploitable IP. We can do this through a ping scan. A ping scan simply pings every IP in a range of IPs and reports any hosts that respond. We can enable this feature in nmap by giving the -sn flag before the target address. Let’s perform our ping scan now:
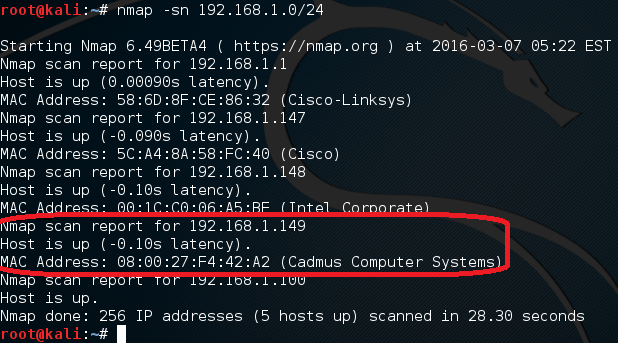
We’ve given a range of 192.168.1.0/24, this means that it will test every IP from 192.168.1.0 all the way to 192.168.1.255. Here we can see that there are multiple hosts on our network. But the address of 192.168.1.149 is the address of our Metasploitable VM. It may prove challenging to find a specific hosts on bigger networks, but there are more advanced scans for that. Don’t worry about them now, we’ll cover them in time.
Now that we have our target IP address, we can scan it for open ports. This will attempt a connection to each port in the range, it will then report back to us which ports are open based on a successful connection. We’ll be scanning the range of ports 1 -100. If we want to specify the range, we need to use the -p flag after we give the target address. Let’s perform our scan now:
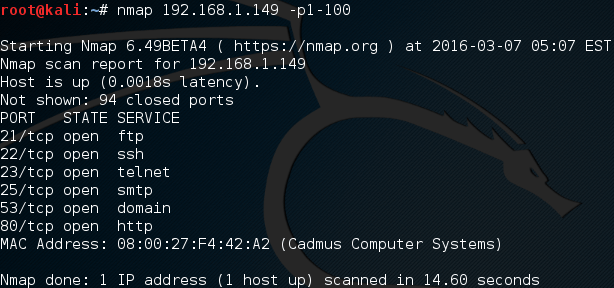
Here we can see that there are quite a few open ports, especially since we only scanned 1-100! Each one of these ports represents a possible attack method for hacking this target.
Now that we’ve identified some open ports, let’s try and figure out what OS the victim is running. We can enable this feature in nmap by giving the -O flag before the target address. This will produce quite a bit of output, so let’s take a look at the command first:
Remember to keep in mind that these are basic scans, we’re making quite a bit of noise against the target here. Now let’s run this command and find our victims OS:
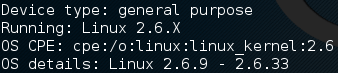
After sifting through the output for a while, we’ve come across what we’re after. Nmap tells us that our victim is running Linux. This result is correct, Metasploitable is built on Linux! There are many tools for OS fingerprinting other than nmap, but this demonstrates that nmap is truly versatile. We’ve covered quite a bit here today, but these are just the tip of the basics when it comes recon, there is still much more to cover. After this article you should have a fundamental idea of discovery, port scanning, and OS fingerprinting. Remember, proper recon is a must for any potential hack.
In the future, we’ll be building our own versions of these tools. I’m a firm believer that the best way to learn how something works is to rip it apart and build it yourself. We’ll be writing our tools in Python and Ruby. But don’t worry if you don’t know either of these languages, we’ll cover the basics we need to know before we build anything. Next time, we’ll take a closer look at port scanning, and some different scan types, see you there!
Tags:
Tutorial