

Welcome back everyone! Recently, we’ve been discussing ARP quite a bit, so I figured I’d take this opportunity to cover a fundamental ARP based attack, the Man in the Middle. We’re going to cover how this attack works and then we’re going to launch this attack on our test network. So, let’s discuss how this attack works.
The Anatomy of a Man in the Middle Attack
A Man in the Middle is just what is sounds like. We’re going to insert ourselves into the middle of a connection. Let’s take a look at a diagram of a MitM attack, then we’ll dissect it further:
We can see in the diagram above that the attacker has killed the victim’s original connection to the server. The victim and server now think they are connected to each other, when they’re actually both connected to the attacking machine. Neither ends of the connection know that anything is wrong, and the attacker can see all unencrypted traffic that flows between them. This attack can be used to do a whole slue of attacks. The attacker and spy on the victim (which is what we’re going to do here), they can send fake information to the victim as the server, and they can catch any passwords that the victim uses to log into the server.
Side Note: Since ARP is a layer 2 protocol, it can only be used in LANs. Therefore, ARP based MitM attacks can only be performed on a LAN
Now that we know the end result of a MitM, let’s discuss the technology behind it. When hosts use ARP, they are trying to resolve IP addresses to MAC addresses. When a host has the MAC address of another host, it will use that address to send data across a LAN. These associations of IP to MAC addresses are stored in the MAC address table of the host. If we can manage to replace the MAC address associated with a certain IP address with our own, that host will send all data meant for that IP to us instead. Now image if we do this for two hosts and replace the MAC address associated with the other host with ours. All data that goes between those two hosts would then be sent to us instead.
Now that we know the ins and outs of MitM attacks, let’s move on to launching the attack!
Step 1: Find Your Victim and the Gateway
If we’re going to be launching an attack, we’ll need to find a victim. You could find victim on your LAN via a ping scan or an ARP scan (just to name a few). We also need to default gateway. Since we’re on a LAN, we’re going to spy on our victims activity on the Internet. This means that we’ll need to launch our MitM between them and the default gateway of the network, that way all data from the victim intended for the Internet must go through us first. I’ve already selected my victim (10.0.0.15), and we can find our default gateway by using the route command:
 We can see by the highlighted output of the route command that our default gateway is 10.0.0.1. Now that we have our victims IP addresses, we’re almost ready to launch our attack.
Step 2: Enable IP Forwarding
Now one of the main issues with ARP based MitM attacks is that since all the data is being sent to the attacker, it won’t get to it’s destination. This will effectively kill the victim’s Internet access and will generate quite a bit of suspicion! We need to make it so that the data can pass through the attacking system instead of bouncing off of it. Doing this will allow our attack to seamlessly come together with minimal suspicion from the victims.
In order to enable IP forwarding, we need to write a “1” to a file under the /proc directory. Let’s take a look at the command that will enable IP forwarding for us:
Step 3: Launch the MitM
We’re going to be using a tool by the name of arpspoof in order to launch our attack. First things first, let’s take a look at the help page for this tool:
 Alright, it looks like we need to use -t and -r in order to specify our victims. We also need to use -i to specify the network interface we want to send our attack out of (in our case, wlan0). Now that we know what flags we need to give, let’s take a look at the command to launch our attack, and some of the output that it will give:
 Here we can see that we’re sending ARP replies that say our MAC address is tied to both the victim’s IP addresses. We’ve successfully launched a Man in the Middle attack! Now that we have this attack going, let’s use it spy on their web surfing.
Step 4: Sniff the Victim’s Activity
We’re going to be using a tool named urlsnarf in order to sniff the victims web activity. Let’s take a look at the command we’ll need to use to start this sniffing:
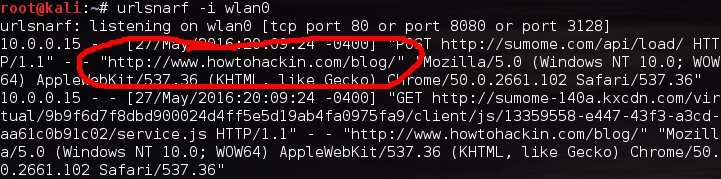 We can see in the highlighted output above that our victim at 10.0.0.15 is browsing on none other than howtohackin.com/blog! Let’s give a brief wrap-up and end this lesson.
Today, we not only learned the anatomy of a MitM attack, we learned how to perform one and how to utilize it to spy on a victim’s web activity. This attack is very common on LANs and, given the proper circumstances, can be very effective in successfully hacking a target. I’ll see you all in the next article!