
In the past two articles, we taught the basics of Ruby in a sort of crash course. The reason behind this crash course was to prepare you for building our own port scanner. That’s what we’ll be doing here today. We have a few things we need to discuss first, so let’s knock those out. We need to discuss what sockets are and how to use them in Ruby, let’s discuss this now.
What are sockets?
Simply put, sockets allow us to make and manage connections over a network interface. This is what allows us to evaluate whether a port of open or closed. If we can successfully connect a socket to the target port, the port is open. Keep in mind that repeated and sequential connection such as this can and will be logged by both the victim and any IDS/IPS devices that may be listening.
Now that we know a little more about sockets, we can actually start making the port scanner. We’re going to be breaking the code down into sections and analyzing each section individually, so let’s get started!
Step 1: Setting Interpreter Path and Requiring Modules
When we make a Ruby script, it can be a real pain to have to type “ruby [SCRIPT NAME]” in order to execute it every time. So instead we can set the interpreter path. This will allow us to treat the file as a regular executable. We can mark the file as a ruby script from within the file by setting the interpreter path. This must be on the first line of the file, and is preceded by the shebang (#!). We also need to import the necessary modules for our port scanner. Modules are chunks of code that are logically grouped into files so we can pick and choose what we need. Now that we’ve discussed what this section of the script will do, let’s take a look at the code, it will seem fairly simple compared to what we just discussed:
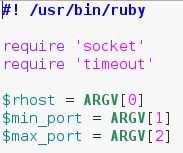 The last bit of this snippet involves us calling multiple elements out of the “ARGV” array. This is an automatically generated array that contains command line arguments in the order they’re given. This means that when we run this script, we need to give the target, the starting port, and the ending port as command line arguments.
Now that we have the first snippet out of the way, we can work with some things we’ve already covered.
Step 2: Generate an Array of Ports to Scan
Now that we have a start and end port provided by the user, we need to generate an array of numbers to serve as port numbers. We already covered how to convert between different port numbers, and we briefly covered how to generate a range of numbers. We’re going to be chaining conversions together here, but don’t worry, it’ll all come out nice and clean. Let’s take a look at this snippet before we dissect any further:
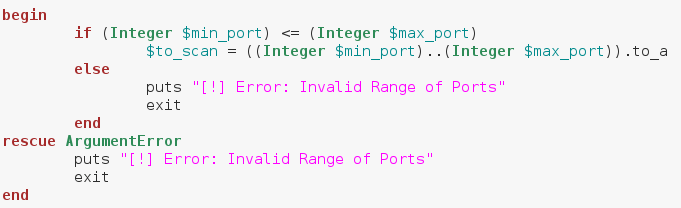 Alright, we can see here that we’ve placed the whole array generation inside a begin/rescue statement. We start our conversion with an if statement, which tests to see if the start port number is less than or equal to the stop port number. This is to avoid generating an invalid range of ports. We’ve stored our range of ports in a new variable called $to_scan. The dollar sign in front of the variable name means this variable can be accessed from anywhere in the script. Now that we’ve got our range of ports, we can build the method to scan a given port.
Step 3: Build the Port Scanning Method
When we finally scan the ports of the victim, we’re going to need to perform the same action again and again, for every port in our array. In order to use this same piece of code over and over again, we’re going to make a method and call that method for every port. Our method will take one argument, a port number, and it will then proceed to connect to that port and return true or false based on the result. Let’s take a look at our method and then we’ll give a deeper look:

We start by creating a socket. We do this by calling .new on the Socket module we required earlier. Then we follow it with some attributes we want our socket to have. Next, we make a new variable named sockaddr, in this variable we store the result of calling pack_sockaddr_in out of the Socket module. In order to connect our socket to a remote host, we need to properly pack the addressing information into it. This is the proper way of doing so, we’ve placed this within a begin/rescue just in case the socket fails to resolve the target.
If you remember back to the very beginning, we imported a second module, timeout. We can make a timeout do loop to attempt a certain action for a certain amount of time. Once the timer runs out it will move on to the next section of code. This timeout is to prevent the script from hanging if a port is unresponsive. It will then assign the resulting value to the result variable. If the connection was successful, it will return 0. We can make a simple if statement to test for 0 result, and return true if it is. We will return false otherwise. Now that we’ve made a method to scan a given port, we can loop through our array and use it.
Step 4: Iterate Over the Array and Call the Method
Now that we have our method, we can use it on our array. We’re going to use a .each loop and give our temporary variable the name “port”. This loop is rather simple, so let’s take a look before we dissect any deeper:
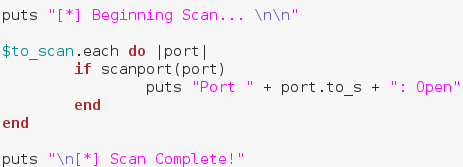 First, we put that we’re beginning the scan, followed by some blank lines for neatness. Then we make a .each loop with our to_scan array. We then make an if statement using our method. Remember how our method returned true or false? Well this is where that comes in handy. Instead of manually evaluating it, we can just place it in an if statement and let it take care of everything. If the result from our method is true, we print that the scanned port is open, anything else we just ignore. Once our scan is complete, we put that the scan is complete. Now that we have our port scanner (available here), we can test it out!
Step 5: Test it Out
Since we have a new tool, we need to test it out. First we’re going to perform a basic nmap scan against our target and see what results to expect:
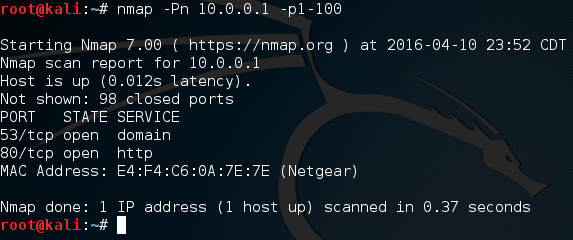 Alright, if we scan ports 1 through 100, we can expect that ports 80 and 53 will be open. Let’s go ahead and fire up our port scanner! First, we need to make the file executable using the chmod command. Once we’ve made it executable, we can fire it up and use it. Let’s do both now:
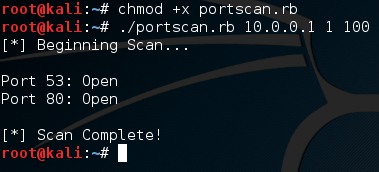 There we go! We were able to successfully build our own, functional port scanner! I hope now that we’ve built our own, we have a bit better understanding about how they work. In the next article, we’ll be covering the concept of discovery, and a few different tactics used by attackers. I’ll see you there!