
Welcome back my fellow hackers! We’ve covered host discovery tactics before; specifically, we’ve covered ping scans and ARP scans. But we didn’t go very in-depth when we covered ARP scans. Today we’re going to dive head first into this enumeration tactic by building our own ARP sniffer!
This tool will use ARP to find other hosts on the network, that way we know who our neighbors are. We’ll be writing this tool in Python, so brush on that if you haven’t already. We’ll also be using the Scapy library for manipulating the packets. We’ve already covered the basic usage of Scapy, so if you don’t know (or just need a refresher) you can find it here. First we’ll go through the script chunk by chunk and explain what everything does, then we’ll test our script to make sure it works. So, let’s get started!
Building the Script
Step 1: Path and Imports
Our fist step is very simple, we’re going to set the interpreter path, and import most of the libraries we’ll be using:
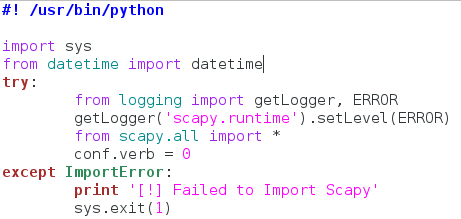
Now this actually looks way more complicated than it is. We start by setting our interpreter path (#! /usr/bin/python), and then we get to importing modules. First we take the entire sys module, then we take datetime out of datetime. Now here’s the weird part. Since Scapy is a third party library, not everyone will have it installed on their machine, so we need to take that into consideration when building our script.
Instead of import Scapy directly, we place it within a try/except block, so that if the import fails (since it isn’t installed) there aren’t errors spilled everywhere. This keeps everything nice and tidy. Within the try/except block we import getLogger and ERROR out of the logging module. We then run the getLogger function as seen above. This will stop Scapy from spilling out its own errors when we import it. We then import everything from Scapy, and set the conf.verb to zero. This will stop Scapy from throwing out messages that packets and been sent and received, which also helps keep things clean. Now that we have all our importing done, we can get to the fun stuff!
Step 2: Declaring the Class and Setting up
In order to make sure this script is as clean as possible, we’re going to keep all the functions for our sniffer inside a single class:
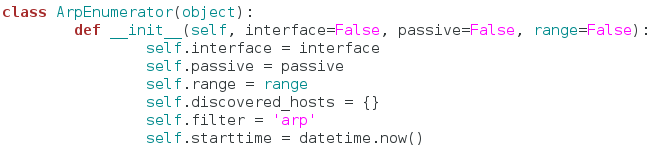
We’ve named our class ArpEnumerator. Next, we define our __init__ function. This function will automatically run when a new instance of this class is made. This is where we can set up variables that will be used throughout the entire class. We’ve taken quite a few arguments in our __init__ function, don’t worry about these for now, just note that the default value for all of them is False.
Now we can set up the variables for our class. We start by simply copying all our arguments into variables that share the same name. Now we can access these arguments across the whole class. Next, we declare a dictionary, but we leave it empty. We will use this to keep track of the hosts we find later. The filter variable is simply set to the string of “arp.” This is a good time to mention that this script will also have a passive mode, in which it doesn’t sent any packets, but still listens for them. This filter will change later to fit the needs of the user. Our final variable is simply the value of the datetime.now function. This will allow us to track when the enumeration starts and stops, so we can tell the user how long it took. Now that we have all our variables set up and ready to rock, let’s move on.
Step 3: Making the Functions
In this step we’re going to create all the functions that our class will use. They are relatively simple, so they should all fit nicely under one section. First, we’re going to make the functions to handle passive mode:
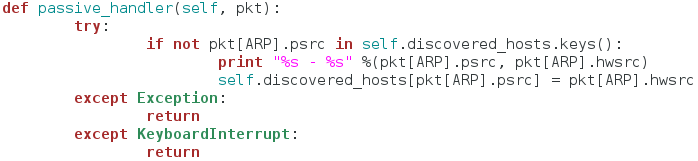
This function serves as a sort of packet handler for the sniffing we’ll be doing later. First, it checks to see if this host is already in our dictionary of discovered hosts, if it is, we move on, if it is not, we print the IP address and the MAC address of the newly discovered host, and place it in the dictionary. This function does nothing on it’s own, it is designed to be used in our next function:
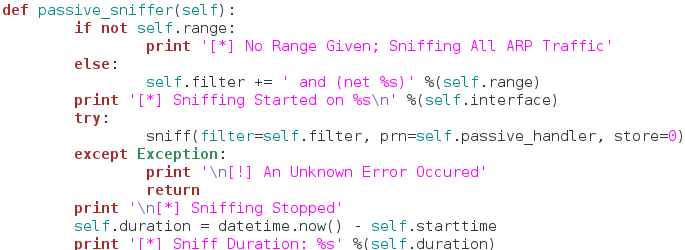
The function seen above will actually perform the sniffing. We start by checking the range variable we set earlier to see if it contains anything. If it does contain something, we edit the filter variable and add the desired range of addresses to it. This way the attacker can sniff for a specific range of addresses, or all the addresses at once. Now that we have our filter ready to go, we call the sniff function inside of a try/except block. We set our filter, and our handler function. We also set store to zero, since we won’t be inspecting these packets any further.
The reason for try/except block is that sniffing in an indefinite process. Once it starts, it will not stop until the user forcibly interrupts it. Since we placed it inside our try/except block, we can handle keyboard interrupts, and properly stop the sniffing. Once our sniffing is complete, we report that sniffing has stopped followed by the duration of the sniffing. Now that we have our passive portion complete, we can move on to the active portion:
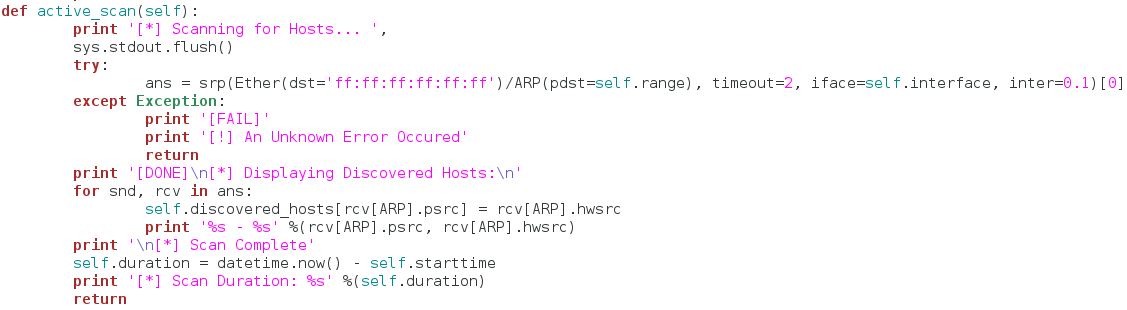
This functions gets a little more complicated than the others. First, we tell the user that we’re beginning the scan. Then, we use the srp function from Scapy to send out ARP requests for all the hosts in the range of addresses provided by the user. Once we’ve gathered all the response packets, we store them in the ans variable (note that we’ve also built a try/except block to handle any errors that occur). Now that we have all our response packets stored in a list, we iterate through them and store them in our dictionary of discovered hosts. We also print out the addresses of the host while we store them. Once this iteration is complete we tell the user the scan is done and stop the clock for the scan duration.
We’re almost done here so just stick with me! The final function of our class does not effect the sniffing in any way, but it’s a nice little added feature:
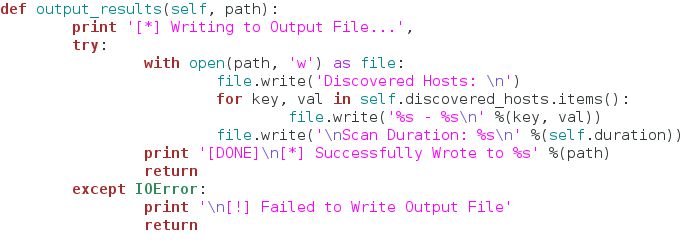
This function simply opens a new file (named by the user) and writes the contents of the discovered hosts dictionary to it. This way the user can output the results to file very easily! Now that we have our class and functions ready to go, let’s use them!
Step 4: Input and Execution
You may think it’s a little weird that we’re taking input so late in the script, but it’s actually not. We’re going to be using another module called argparse in order to take command line arguments in a very clean and easy manner:

If you feel intimidated by this large chunk of code, don’t. It’s just importing argparse and setting up all our arguments. I’m not going to go through and talk about every single argument, as they should be very self-explanatory since we just built the functions that use them. Let’s move on:
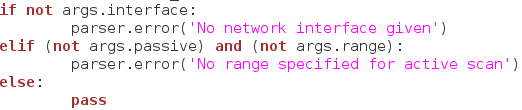
Now we just have to do a few checks before to execute our scan. Here, we check the arguments given to make sure everything lines up. We check for a specified network interface, and then we check to see if a range is given for the active scan (since the active scan is required to have a range). Now that we’ve made sure everything is in order, we can finally execute our scan:
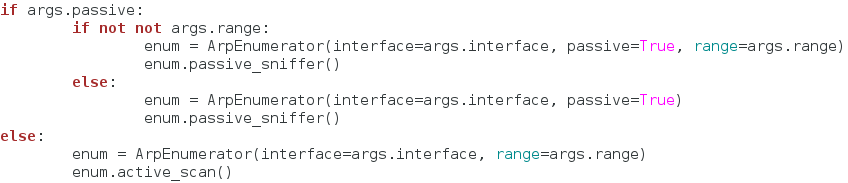
We use some basic if statements to find what kind of scan our user wants, and then we create a new instance of our class under the enum variable. Once we’ve got the scan type figured and the class instance created, we execute our scan! Now that the scan is complete, we need to see if the user wants to output the results to a file:
That does it, our script is complete! Now that we’ve spent so long building it, we can finally test it!
Testing the Script
We’ll start by view the help page that argparse generates for us:
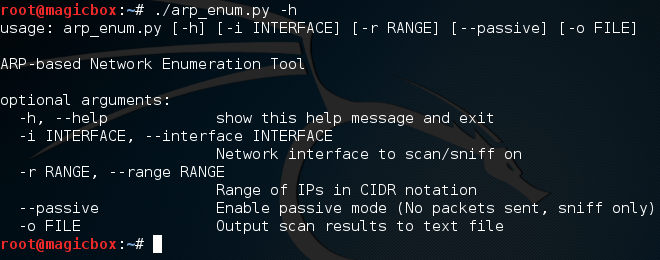
Looking good! Let’s go ahead and test the active scan, we’ll also output the results to a file named enum.txt:
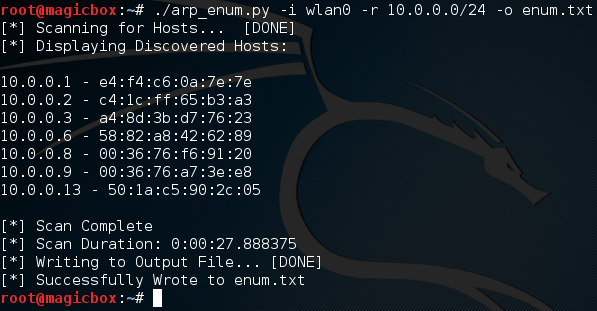
We started a scan looking for all addresses within the 10.0.0.0/24 range, and it worked! We also successfully output our results to a text file, let’s check that file to make sure it went well:
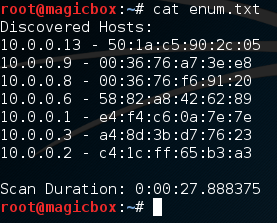
Excellent. Our scan worked and our output file looks good. Now that we know the active scan works, let’s give the passive scan a try:
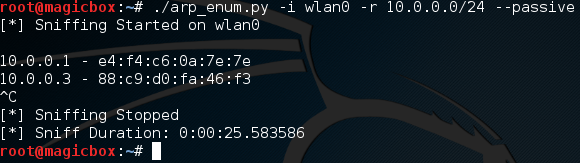
It works! It’s worth noting that passive sniffing will normally take a rather long time. I had mine running for a few minutes and only managed to catch two hosts. The perks of passive sniffing is that no packets are sent out, so the victim has no way to tell that they’re being watched! This helps us prevent tripping security devices such as an intrusion detection system, which can be set off by sending too many packets at once.
There we have it! Our script works like charm. Now that we’ve got our hands dirty and built our very own ARP enumerator, we should have a much deeper understanding about how ARP enumeration works. Remember: The best way to learn how something works, is to tear it apart and build it yourself!
Tags:
Learning