Most people – even nontechnical users – have already heard about Linux operating systems. However, average users aren’t aware of how powerful Kali Linux is. Kali Linux was designed to be a hacker’s or security professional’s best friend, since it comes loaded with a variety of tools and programs that aren’t always available on other operating systems. The real key advantage is that all of these tools have been prepackaged into one system, so you’re ready to go when you begin a new installation provided you install Kali with the right optional packages.
Though Kali Linux can be used for all kinds of security attacks and penetration tests, one of the reasons it has become so infamous is due to its ability to break wireless encryption standards that secure wireless devices such as routers. Once an attacker leverages Kali Linux to break wireless systems, they can provide themselves with full network access. In home settings, the consequences of being hacked may be nominal, but in a professional setting such as an office, an attack could be many times more damaging.
If you are the type of person that is technologically literate and understand the different types of wireless security protocols, you know how easy it is to break certain forms of encryption and security. In this demonstration, we are going to take a step-by-step look at how you can break WPAand WPA2 (Wi-Fi Protected Access 2) using Kali Linux.
What You Will Need for the Demo
First off, you are going to need a Kali Linux installation. If you prefer to install Kali Linux to your hard drive and feel comfortable working with multiple operating systems on a single host computer, feel free to install the software. In addition, you have the option of building your own machine that will run Kali Linux exclusively. However, there is an easier solution.
If you download and install VMWare, you can run a virtual Kali Linux image simultaneously in your host environment, such as Windows. There are a couple of extra configuration steps you will need to make to your virtual machine’s network interface, and there is one additional caveat. By default, there isn’t a way to bridge the internal wireless card in a laptop through to VMWare, so in this case, you would need an external USB wireless adapter. You might find that your wireless hardware isn’t capable of running monitor mode, in which case you can easily purchase a USB wireless card to use in the demonstration.
You will also need a wireless router that you own to practice on. Exercise great caution before applying these techniques, because it would be illegal for you to try to break into a system that you don’t own. Make sure you have the following items together before you begin:
- A computer system with Kali Linux installed
- A wireless router that you own configured to use WPA2
- A wireless card that is capable of running in monitor mode
- The aircrack-ng software
The Attack Process
Once you have all of your hardware together, it’s time to begin the attack process. Note that it would be best to have root privileges on the Kali user account you are using to perform the attack. Otherwise you may have to use the sudo command, which can be extremely tedious.
Step 1
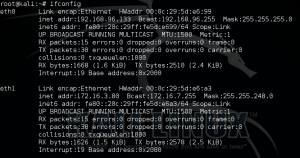
Make sure that your network card is visible in Kali by using the ifconfig command. If you are using a wireless card via USB, ensure that it is plugged in.

Step 2
Make sure that your computer isn’t currently connected to a wireless network. Then you will need to run the airmon-ng command from the terminal. This command will display all of your wireless interfaces that are capable of running in monitor mode. Unfortunately, if you don’t see any interfaces listed, your card likely isn’t capable of monitor mode.
Step 3
Now you need to actually start using airmon-ng on your wireless interface. In our example, the wireless interface is named wlan0, so we would enter the airmon-ng start wlan0 command. After you have completed this step, output in the lower-right corner of the terminal should display the listening wireless interface (it will likely be named mon0).
Step 4
Next, you will need to run the dump command with the listening wireless interface as a parameter. In our example, the command we would need to enter would be airmon-ng start wlan0. This will show you any information gleaned from wireless networks in range of your wireless card such as the encryption type, the BSSID (essentially the MAC address of the wireless device), and other information such as the channel and model number of the wireless device.
Step 5
Find the wireless network that you want to crack and copy its BSSID. You will need to plug other information from the airodump-ng command into the command that starts the attack procedure. The command we will need to use is as follows:
- airodump-ng -c [wireless channel] –bssid [BSSID] -w /root/Desktop/ [monitor interface]
Remember that the monitoring interface in our example is mon0.
Step 6
The next step can be a little troublesome. By now your wireless interface is gathering and storing information about the wireless network, but in order for the attack to succeed, we will need a host to connect to the wireless network. When a device connects to the wireless router, our Kali software will capture data regarding a four-way handshake that is the weak point in the protocol. If you were performing this in real-life on a live network, there’s no telling how long it could take for a host to connect. Fortunately, since we are doing this in an environment we control, we have the option of connecting another device to the network manually.
Alternatively, you can use a de-authorization command, which feels a lot cooler. Essentially, this command will craft some de-authorization packets to send to the target wireless router to force the reconnection process for other devices. We will target a device to force to reconnect by using the client’s BSSID in a command. The only requirement is that you already need to be able to see a connected client’s BSSID in the previous command’s output.
Step 7
Make sure that you don’t close the terminal that you started running the airodump-ng command. Then, open a second terminal and enter the following command:
- aireplay-ng –0 2 –a [Router-BSSID] –c [Client-BSSID] mon0
Step 8
You should see output that displays the indication of a successful handshake. If you don’t, however, there are a multitude of factors that could have caused it to fail. One common problem is that the wireless signal was too weak, in which case you would only need to move your computer closer towards the wireless router. In addition, the connected device may not be configured to automatically reconnect to the network. If that’s the case, then you will have to wait for them to reconnect (in a real-life scenario).

Step 9
Upon a successful reconnection handshake, we are going to need to crack the protocol. Enter the following command, and plug in the parameters as they pertain to your configuration:
- aircrack-ng -a2 -b [Router-BSSID] -w [Wordlist-File] /root/Desktop/*.cap
The only new parameter in this command is a wordlist we have not yet discussed. A wordlist is basically a file containing different character combinations that we will use to carry out the attack. You can find them online for free, just make sure you remember where you store the data on your computer and use the file’s path as a parameter in the preceding command.
After you have entered the command, the software will finally initiate the process of breaking the wireless encryption.
Step 10
Now all you need to do is wait for the software to break the key. Note that in order to successfully break the encryption, the Wi-Fi password needs to be contained in the wordlist. This is called a dictionary-based attack, which is a little different from a brute force attack. A dictionary-based attack simply tries all of the passwords in a list or database whereas a brute force attack tries all possible combinations of characters. If your dictionary failed to find the correct password, you can try using an additional wordlist. Also note that it could take a long time to actually break the password, depending on the strength and complexity of the password as well as how fast your computer hardware is.
Step 11
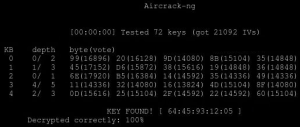
Once the software successfully cracks the password, it will display the key near the middle of the terminal in a line that reads:
- KEY FOUND! [ wireless key ]

Go ahead and try logging in with the key for fun, though you should already know what the key was since you are using this on your home network.
Final Thoughts
Breaking WPA and WPA2 encryption is pretty easy as far as security attacks are concerned. But please remember to use this information responsibly. You simply don’t have the right to run around war driving and attacking other people’s networks, and the consequences could be terribly severe.
